Saturday, September 26, 2015

How to make Home made Beef Jerky

                Here is something the whole family will like to eat. Beef Jerky!  This is another way you can save a lot of money.  Homemade beef jerky is easy to make. Like I said in previous Blog Posts I use my dehydrator at least 3 to 4 days a week. This time of the year I am canning, freezing, and dehydrating non-stop.  It is time to stock up on canned, frozen and dehydrated food for the winter months. Beef jerky in the store can be over 8 dollars a pound, that’s way too expensive for me. In this Blog, I will show you step by step how I make homemade beef jerky and the recipe I use for the sauce. I take two 2 pounds of roasts and I am lucky if the beef jerky makes it two days before my family devours it.

Step 1: I like to take a frozen beef roast because it is easier to cut into thin slices this way. Take a good sharp knife and cut thin slices. Trim of as much fat as possible. Trying to cut a roast when it is not frozen will make it harder to get thin slices. Any type of roast will do fine. I have used an arm roast or a tip roast when I make my beef jerky.

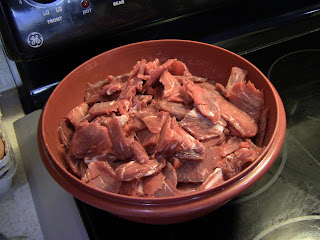
Step 2: Next place your thin slices of meat in a zip locked bag or a bowl with a tight seal. I use a bowl with a tight lid so I can shake it up easier with my sauce.  But a ziplock bag will work just fine also.

Step 3: The sauce recipe I use is: 
Two 2# Roasts thinly sliced and fat cut off
¾ cup Worcestershire sauce                          ½ teaspoon garlic salt or regular salt
¾ cup Soy sauce                                               ½ teaspoon pepper or more if you like it really hot
¾ cup ketchup                                                  1 Tablespoon Liquid smoke

Mix all the ingredients in a bowl and pour over your meat in a bag or bowl and seal. Next shake the sauce around and over your meat. Let the meat soak for at least 2 hours shaking the sauce around and over the meat every 15 to 30 minutes.

Step 4: Place your soaked meat on your trays and do not overlap them. Make sure you have a tray on bottom, that can soak up the excess juices. I like to use one of my fruit roll-up trays for this purpose.  Set your temperature for meat according to your dehydrators directions.  Depending on how done you want your beef jerky it can take up to 4 to 6 hour to dehydrate.  About half way through I like to flip all my meat and switch the bottom tray around with the top trays. This helps the meat cook more evenly.

Step 5:  Take the beef jerky off the trays and place in an air- tight bag or a bowl with a tight cover. This should keep for over a week if you can keep the family out of it that long. My beef jerky barely makes it past two days and it is all gone.


Making my own beef jerky is fun and easy, plus it saves me a lot of money.  I know what goes into my beef jerky, so it is much healthier and taste much better than store beef jerky. Have fun making your own beef jerky from Suzie Homemaker.


Monday, September 21, 2015

How to Make Homemade Cleaners

                Here are some easy homemade cleaners I make at home. To save money I make my own homemade cleaners. They are cheap and easy to make from ingredients you probably have at home already. Cleaners from the store are very expensive and can be very harsh on the skin and eyes.

1.       All -purpose Cleaner: Take ½ cup Borax and dissolve in 1 gallon of hot water. Pour into a spray bottle and spray on surface, Wipe clean.

2.       Toilet Bowl Cleaner: Take ½ cup of Borax and add ¼ cup of vinegar to remove stains. Watch it fizz in your toilet.

3.       Unclog Drains: Pour ½ cup baking soda or washing soda down the drain. Gradually add ½ cup white vinegar. Let fizz. Carefully pour boiling hot water down the drain. Wait 30 minutes and repeat if necessary.

4.       Glass Cleaner: Take 1 Tablespoon lemon juice or ¼ cup white vinegar. Add 3 to 4 drops of liquid soap, Mix with 2 cups water and put into a spray bottle.

5.       Fume –Free Oven Cleaner: Mix 1 cup baking soda with ¼ to ½ cup washing soda. Add 1 Tablespoon liquid soap and a few drops of white vinegar. Mix in just enough hot water to make a paste. With a cold oven, coat the oven surfaces and let sit overnight. Wipe off the next day with warm water.
6.       Soft Scrub: Take 1 cup of baking soda and add 2 to 3 drops of liquid soap. Mix just enough warm water to make a paste.


Just think how much money you can save by making these easy cleaners yourself. I like to find ways to save money on all kind of things around the house. In future Blog Posts I will give you more saving ideas. Have fun cleaning from Suzie Homemaker.


Saturday, September 12, 2015

Inexpensive Ideas for Wrapping Presents

Here are some simple easy and inexpensive ways to decorate gifts. When I was growing up my parents did not have a lot of money to spend on wrapping paper for every occasion. So we made our own wrapping paper out of things we had around the house. As a kid, it was always fun to run around the house to find something unique and different to wrap a present with. Wrapping paper, ribbons, bows, and labels are expensive. If you still want to buy paper and all the fixings at least wait till they are on clearance and stock up for the next year. Here are some cheap and inexpensive ways to save on wrapping paper and labels.

Wraps and bags:

.reuse and save little to medium size boxes to wrap your presents.
.save wrapping paper and tissue paper from your presents and reuse them.
.use the Sunday comics for great kids wrapping paper.
.reuse specialty bags from stores for wrapping paper.
.use some left over material or bandanas for wrapping paper.
.use paper bags and have the kids decorate them.
.wrap your food items in dish towels.
.take leftover tote bags and baskets and use for gifts.

This is a fun and inexpensive way to wrap presents.The kids will have fun making their own wrapping paper and putting their own special design on them.

Gift Cards & Labels

.Make your own cards and labels out of heavy paper or cardboard.
.Try using markers, rubber stamps, or clippings from magazines, postcards and calendars to make cards and labels.
.Use personalized business cards folded in half.
.use leftover paper and fold in half.
.Take Holiday cards and turn them into gift tags.

There are so many things you can use to make your own gift cards and labels at little to no cost if you just look around your house.

Ribbons and Ties

.save your ribbons, ties and bows from all your presents and reuse them.
.use some leftover yarn or heavy string or cord to decorate and tie your presents.

Making your own wrapping paper and tags and labels is a great project to do with your kids and it is fun. There are so many things you can use and find at home. I hope you enjoyed another helpful tips and ideas from Suzie Homemaker.


Thursday, September 3, 2015

How to Make Quick Easy Mixes

                Today I would like to talk to you about making mixes. When I was growing up my mother always had mixes on hand to make quick easy recipes. These mixes were handed down from my Grandmother. Today I still use these mixes and I would like to share a couple of them with you plus some recipes. Making your own mixes save you time and money.
                Why buy from the store when you can make these mixes yourself at less than half the cost.  All you will need are a few basic items like flour, sugar and shortening. Stock up on these items when they are on sale. Stores advertise these mixes as being convenient and time-savers rather than money-savers. Depending on what you buy for mixes they can vary in price. Mixes can get very expensive, why not save time and money and make them yourself.
                Mixes are much more nutritious and healthy for you. If you want to reduce preservatives and additives in your diet this is one way to start.  Have you ever checked the labels on those box mixes from the store, some of them have been on the shelves for over a year. Reading the ingredients on the boxes can be scary; I like to know what is in the food I am eating. When you make your own mixes the food is fresher and tastes much better.
                Today I would like to start you off with 2 mixes and some recipes. In future blogs, I will give you different mixes and more recipes. These mixes need to be put in an airtight container in a cool dry place. They have a shelf life of 10 to 12 weeks. If you find that the mixes are too large just cut them in half. Make as little or as much as you will need or want to have on hand.

                Quick Mix No.1
                8 ½ cups all- purpose flour                    1 teaspoon baking soda
                3 Tablespoons baking powder              1½ cups instant dry milk
                1 Tablespoon salt                                    2 ¼ cups vegetable shortening
                2 teaspoons cream of tartar

                In a large bowl sift all dry ingredients together. With a pastry blender cut in shortening. Mix will.The dough will look like cornmeal. Put in an airtight container  label and date. Use within 10 to 12 weeks. This recipe makes 13 cups of mix.


                Recipe No. 1               Sugar Cookies
                3 cups Quick Mix                                               1 egg beaten
                1 cup sugar                                                         1 teaspoon vanilla
                ½ cup milk’

                In a bowl mix Quick mix and sugar. Add milk, egg and vanilla. Mix well.  Drop by teaspoonful’s onto a greased cookie sheet. Bake at 375 degrees for 10 to 12 minutes. This recipe makes 30 to 36 cookies.

                Recipe No. 2        Molasses Cookies
                2 cups Quick Mix                                                        ¼ teaspoon cloves
                ¼ cup sugar                                                                  1 egg yolk
                ½ teaspoon cinnamon                                               ½ cup molasses
                ½ teaspoon ginger

                I a bowl combine Quick mix and all dry ingredients. Add egg yolk and molasses to mixture.. Blend well. Refrigerate dough for 1 hour. Shape into 1 ½ inch balls and roll in sugar. Flatten down with the bottom of a cup. Bake at 375 degrees for 8 to 10 minutes. This recipe makes about 30 cookies.

                Recipe No. 3           Cinnamon Thin (this one my kids love)
                3 cups Quick Mix                                                       1 egg beaten
                3 Tablespoons sugar                                                 1 1/3 cups sugar
                ¼ cups melted butter                                               3 Tablespoons cinnamon
                ½ cup milk

                In a bowl combine Quick mix and 3 tablespoons of sugar. Combine melted butter, milk and eggs to dry ingredients. On a lightly floured surface knead dough for 8 to 10 times. Form into 40 1 inch balls. Roll in cinnamon mixture (1 1/3 cup sugar and 3 Tablespoons of cinnamon). Place each ball inside two  pieces of wax paper. Roll with a rolling pin turning dough over several times until paper thin. Bake at 450 degrees for 4 to 5 minutes.


                Basic Cookie Mix
                8 cups all-purpose flour                                            4 teaspoons salt
                2 ½ cups sugar                                                            1 ½ teaspoons baking soda
                2 cups brown sugar                                                    3 cups vegetable shortening
                                                
                In a large bowl combine all dry ingredients. Cut in shortening. Put in large airtight container label and date. Use within 10 to 12 weeks. This recipe makes 16 cups of mix.

                Recipe No. 1           Very Vanilla Cookies
                3 cups Cookie Mix                                                       3 Tablespoons milk
                1 ½ teaspoons vanilla                                                   1 egg beaten
                                             
                In a bowl combine Cookie Mix, vanilla, milk and egg. Mix well. Drop by teaspoonful’s onto a greased cookie sheet. Sprinkle with sugar if desired. Bake at 375 degrees for 10 to 12 minutes. This recipe makes about 24 cookies.

                Recipe No. 2       Snickerdoodles
                2 ½ cups Cookie Mix                                                  1 egg beaten
                ¼ teaspoon baking soda                                           2 Tablespoon sugar
                1 teaspoon cream of tartar                                      1 teaspoon cinnamon

                In a bowl combine Cookie Mix, baking soda, cream of tartar and egg. Mix well. In a small bowl, combine sugar and cinnamon. Shape into 1 ½ inch balls. Roll in cinnamon and sugar mixture. Place on greased cookie sheet 2 inches apart. Flatten slightly. Bake at 400 degrees for 8 to 10 minutes. This recipe makes about 24 cookies.

                Recipe No. 3    Peanut Butter Cookies
                3 cups cookie mix                                                    2 eggs beaten
                ¼ cup brown sugar                                                  ½ cup creamy or chunky peanut butter
                1 teaspoon vanilla

                In a bowl combine all ingredients. Blend well. Shape into 1 inch balls and flatten with a fork. Bake at 375 degrees for 10 to 12 minutes. This recipe makes 30 to 36 cookies.
                Variation: Peanut butter and jelly cookies. Do not flatten cookie. Press thumb into the center of your balls. Fill with your favorite jam or jelly then bake.