Monday, April 24, 2017

Mock Kentucky Fried Chicken

                How many of you like Kentucky Fried Chicken? I know my family loves it but it is getting way too expensive to buy this at the restaurant. So one day my youngest daughter did some research online and found me a mock version of Kentucky Fried Chicken. This recipe has now become our families favorite fried chicken recipe. I love cooking from scratch so this recipe was right up my alley. So, today I decided to share this recipe with my readers. This recipe has a lot of spices but it tastes great. Warning, If anybody is allergic to peanuts do not use the peanut oil for frying, use any other oil like corn oil or olive oil.
Mock Kentucky Fried Chicken

                1 whole chicken cut into pieces. (or chicken breasts cut into thin slices)
                ½ Quart Peanut oil (or any oil you like)
                2 egg whites whipped with ½ Tablespoon milk
                1/3 Tablespoon salt
                1/8 Tablespoon Thyme
                ¼ Tablespoon Basil
                ¼ Tablespoon Oregano
                ½ Tablespoon Celery Salt
                ½ Tablespoon Black Pepper
                2 Tablespoons Paprika
                ½ Tablespoon Dried Mustard
                1 Tablespoon Garlic Salt
                ½ Tablespoon Ginger
                1 cup Flour

1.       Take your unthawed chicken and cut into small pieces. I tried the whole chicken first and liked the chicken breasts cut into thin pieces better. No bones and less time to fry the chicken.


2.       In a small bowl whip your eggs whites and milk together and set aside.

3.       In a bigger bowl mix all your spices and flour together and set aside.

4.       In a large deep skillet pour your ½ Quart of oil in. Heat your oil up. With a meat thermometer or candy thermometer heat your oil to 300 hundred degrees.


5.       When your oil is heated, take your chicken pieces and dunk them in your egg and milk mixture.

6.       Next, dunk your chicken into your spices and coat the chicken patting the flour mixture around your chicken.

7.       Place your chicken pieces into the 300 hundred degrees oil and start frying them. You can use the oil two times before you need to replace the oil.


8.       If you are using the whole chicken pieces your will have to cook them for 20 to 30 minutes. Taking your tongs flip the pieces several times until the chicken comes out golden brown. I used thin pieces of chicken breasts cut into nuggets and strips and I fried them for 10 to 20 minutes.


9.       When the chicken is done frying place on a plate with paper toweling to drain off some of the oil.

10.   If you have any leftovers just place in a 350-degree oven for 15 to 20 minutes to reheat them back up. They come out just as crispy as if you had just fried them up.

When chicken is on sale stock up and cook yourself some Kentucky Fried Chicken you can make at home for less than half the price you pay at the restaurant. My family loves this recipe thanks to my daughter. I find myself making this recipe 2 to 3 times a month with no complaints from anybody. This recipe is a little time-consuming to make but well worth the wait. I hope you enjoy my daughter's recipe for Kentucky Fried Chicken from Suzie Homemaker.


Monday, April 17, 2017

How To Save on Pets

Today I would like to talk to you about pets.  How many of you have cats or dogs for pets? Some of you may even have smaller pets like fish, rats, gerbils, birds or any other small pet. Pets can be expensive no matter what size pet you have. So today I want to give you some helpful tips on how to save a little money when it comes to pet food and supplies. If you have a bigger pet like a cat of dog you have to consider vet bills. These bills can add up to a lot of money each year.

1.       Vet bills. Check around and do some calling to different vets and see who is the cheapest for your pet’s annual check- up. Some of you smaller vets can be a little cheaper. Smaller towns and vets sometimes can save you a little money, Vet bills are your biggest expense when you have a pet.

2.       Food can be expensive, or cheaper if you do some research and check out different stores. We have a cat named Mari Mar ( alias Pinky because she has pink ears and paws).
I find I get a better deal at a Farm and Feed stores. I use Fleet Farm for an example. I buy bigger bags at a much bigger discount. Even your local Warehouse store like Sam’s Club or Costco’s has bigger bags of food at a much cheaper price than at a Vet office or a store like Petco. I even go to Aldis sometimes for cheaper cat food. Food prices can vary, so why not go where you can save a little money.

3.       We have a cat so let’s talk about cat litter. I saved a bundle when I went to Costco’s for my cat litter. I bought a 40-pound bag for $10.00 dollars. Even at Walmart, a 20 Pound bags would cost me over $8.00 dollars. Watch for the deals and stock up when you find a deal.


4.       Toys for your pet are best bought at a Farm and Feed store. Again, we have a local Fleet Farm where prices are a lot cheaper.  Buying these things from a pet store is paying way to much.


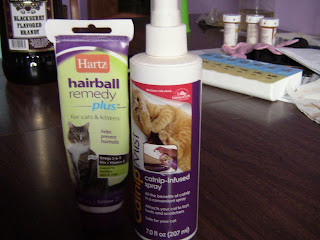
5.       I buy all my cat supplies like Hairball medicine, Catnip spray, and Nail clippers at either Walmart or Fleet Farm. I don’t have my cats nails cut professionally because I can cut them myself for a lot cheaper. I bought a $2.00 dollar nail clippers from Walmart and cut my cats nails myself.


Having a pet can be expensive, so why not cut cost where you can. Having a pet can give you a lot of love and companionship. You don’t have to break the bank when you have a pet. You just have to know how to shop for the deals and how to cut costs. Enjoy your pet while saving money in the process from Suzie Homemaker.


Monday, April 10, 2017

Easter Egg Tree

                Easter is here, what can I do with my children or grandchildren while they are home on Easter break? I have a fun project that will keep them busy for a little while. One year when my children were much younger I decided to show them how to make an Easter Egg Tree. If you are like me I buy all my Easter decorations after the season to save a lot of money. Saving all these little decorations over the years has added up to enough stuff to make many different Eater decorations. Saving dried or plastic flowers, ribbon, and plastic eggs are all I needed for making many different kinds of Easter projects through the years.

What You Will Need

1 half circle styrofoam ball                                       Tree branches
Masking tape                                                           1 small box
Spray paint                                                               plastic eggs (small)
Ribbon any color                                                       Decorations (butterflies, beads, flowers)
Material to wrap around the eggs  (optional)

1.       First, find some dry branches from outside. If you don’t want to use tree branches take some wire hangers and bend into the shape of tree branches.


2.       Take your tree branches or hangers and make it look like a miniature tree. Wrap masking tape around all the branches. Make sure everything is covered including the stem or trunk of your tree in masking tape.


3.       Spray paint the whole tree in any color you like. If you do not have Spray paint try taking a little paint brush and hand paint your tree. This will take a little longer but the children might like it better. Let dry.

4.       Taking your small Easter eggs wrap them in colored material or just leave them plain. Take a hot glue gun or just super glue and glue on your ribbons
.

5.       Next, tie your Easter Eggs onto some of your branches.

6.       Add some other decorations like flowers, butterflies, and beads to your tree.


7.        Cut a hole the size or the bottom of your half styrofoam circle and glue it into the box.  This will be your platform to hold your Easter Egg Tree. You could have your children or Grandchildren decorate the box in any way they would like.


This project will take them awhile to make. Having fun with the kids is the whole purpose of this project. Saving little trinkets from year to year can save you a lot of money on projects like these. The only thing I had to buy was the styrofoam ball, the rest I had at home already. Let your children’s imagination run wild. Let them create their own Easter Egg Tree with odds and ends of things you have around the house. Have a wonderful Easter with family and friends and don’t eat too much Easter candy from Suzie Homemaker.


Monday, April 3, 2017

Homemade Easter Egg Dyes

Easter is almost here, it’s time to dye some eggs for Easter. When I was growing up my mother made her own dyes for the eggs. With 4 children my poor dad had a lot of hard boiled eggs for a while. My mother would boil 2 dozen eggs and we would each have 6 eggs to decorate each. This time of year I felt bad for my father because nobody liked cold hard boiled eggs, for the next 2 weeks all he ate was eggs. He never minded eating them. He would just smile and say great looking eggs. I miss those days and my father who is no longer with us, but I still decorate a few eggs each year at Easter time. Use this time to decorate your own eggs with your children or grandchildren.


Recipes for Homemade Dyes for Easter Eggs

1.       Red Dyes: 2 cups of beets grated. (I used my canned beets and I mashed them). 1 Tablespoon of white vinegar and 2 cups of water. If you don’t have beets try raspberries chopped. Boil for 15 minutes before placing your hard boiled eggs in the dye. The longer you let them sit in the dye the darker the color.


2.       Yellow Dyes: 3 large yellow onion skins chopped up. 1 Tablespoon of white vinegar and 3 cups of water. Boil for 15 minutes before placing your eggs in the dye. Again the longer you let them sit in the dye the darker the color.

3.       Blue dyes: 1 pound blueberries crushed. 1 Tablespoon of white vinegar and 2 cups of water. Boil for 15 minutes before placing eggs in the dye. The longer you let the eggs sit in the dye the darker the color.

4.       If you want to get creative place some rubber bands around the eggs before dying to creative a neat design. We also used crayons to write on them before dying the eggs. The dye will not stick to the crayons. Sometimes after the dying was done we would use markers or stickers to add a little more detail to the eggs.


5.       Adding the vinegar to the dyes helps the colors set better. You can also mix and match colors to create different colors. Just use your imaginations and have some fun.

6.       Since we have our own chickens our eggs are brown. You can dye brown eggs too, it just takes a little longer for the color to appear and the red turns out to be a darker brown. This is what I used when I dyed my eggs for this post.


Easter is about being together with your family. Making Easter Eggs is a fun way to spend time with your children and grandchildren. Everybody loves Easter Eggs and decorating them. Instead of buying the expensive dyes why not make healthy dyes instead with food you probably have at home already. I hope you enjoy my homemade dyes from Suzie Homemaker.