Sunday, January 31, 2016

Different ways to do your taxes

Taxes, Taxes, Taxes! It’s tax time and all those W-2’s are all coming in. Now that January is almost over it is time to think about getting your taxes done. I am no expert on this subject, but I would like to give you some different ways to have your taxes done. Tax time can be stressful and expensive. So today I will try to give you some different ways to get your taxes done.

1.       If your taxes are easy to do, try going to your local Library and picking up the forms for free.

2.       Go to your local IRS office and pick up forms for free.

3.       If you can use a computer, try going online to a tax site. Here is a good tax web site that can show you step by step how to do fill out your taxes and file them online.

4.       Buying your own tax program can get pricey, and sometimes you can have problems and end up doing them incorrectly.

5.       If you have a more complex tax return or business return, I recommend seeing a Tax Professional. Seeing a Tax professional sometimes is better because they take classes each year to review all the new tax laws and changes.  Yes having a Tax professional can get expensive but sometimes it is well worth it to know they are there for you. If you ever get an IRS letter see a Tax Professional right away.


If you are one who receives money back each year great. But for the unlucky ones I would suggest seeing a Tax Professional to see if you can lower your taxes in any way. There are so many different options out there to get your taxes done. Choose wisely to get your best return for the price. Hope you receive a big refund from Suzie Homemaker.

Wednesday, January 20, 2016

Braided Rugs made from old shirts

 Here’s another thing to do with old worn out shirts. Don’t throw them away yet, I have another use for those old shirts of towels. Since my cat had her kittens right before Christmas, I decided to make a little-braided rug for them to lie on and keep them warm. So today I will show you how to make a braided rug out of old t-shirts.


1.       Lay your shirt flat on the table and take a ruler and mark out your strips. I used a marker and made 2-inch lines on the shirt. As you can see I left the sleeves and collar behind.

2.       Now take some pins and secure your rows. Cut out your 2-inch strips. Don’t worry if you can’t cut straight because you will never see this when braided.


3.       Take your strips and fold them in half and sew them together. If you do not have a sewing machine just take an iron and press them in half.

4.       When you have three strips done, use a needle and thread or use a sewing machine to bind them together. Start braiding them. When you get to the ends use a needle and thread or sewing machine to bind the ends.

5.       Lay out your braided rows side by side to stretch as needed to make an even rug
.
6.       Start using a needle and thread and sew your braids together
.
7.       If you want a longer rug just sew on extra strips. You can make your rug as long or wide as you like. I made a small one for my little kittens.


This is a nice project you can do with your kids on the weekend. My little rug took me about 3 hours to make. I don’t like to waste anything, so I find uses for most everything most people would just throw out. Have fun making this rug and spending time with your kids in the process. Another fun, easy, and inexpensive project from Suzie Homemaker.


Tuesday, January 12, 2016

Homemade Meals vs. School Lunches

I would like to ask you a question today, which is better school lunches or lunches from home? To me there is a big difference in quality and price. Today I would like to give my opinion on the home cooked meals vs. school lunches. If you are on a budget and are considered low income you should take the school lunch program because you can qualify for reduced price or even free meals.
School lunches can be good but also very pricey. My child is in High School and the school lunch program cost almost $3.00 dollars a day. The one thing I found out is the quality of the food is not that good and the amount of food they give them is not enough. If they want more of anything it all cost extra and that ads up. If she ate lunch at school every day I would be paying over $20.00 a week just for lunch for my child. This adds up to over $ 80.00 dollars a month. To top it all off my child doesn’t even like the food half the time so I’m wasting my money.

So today I will show what I do for my child for lunches and how I save a lot of money in the process. I still put a little money in her school lunch account for emergencies and if she has to stay after school for anything. Most of her meals, snacks and juices come from home packed by mom every day.

I decided, if I was going to do this right I needed a nice insulated lunch bag for my child. I found a very nice one for under $10.00 dollars on clearance which had a nice ice pack included in the bag.


Let’s start with juices. My child loves to drink Propel, but at $1.50 a bottle in the vending machine at school that gets very expensive. So I found a cheaper way to give her Propel. I found little packets of Propel in the grocery store to make in your own bottles for only 20 cents a bottle. For variety I also give her juices, Powerade and milk.


Next let’s talk about snacks. Snacks can be very expensive if you buy them in a vending machine. At over 50 cents a bag I decided to buy them myself. I buy boxes of 50 chips and spend about $13.00 dollars. So,  I spend about 25 cents a bag instead. Buying bigger quantities is always cheaper and last a little longer. I also buy big bags of chips when they are on sale and put them into zip lock bags for a snack for lunch. Here are a few things I give my child for snacks. I buy pudding cups, string cheese, yogurt,apples,oranges and bananas.  Packing these snacks is easier and cheaper than buying them from a vending machine.
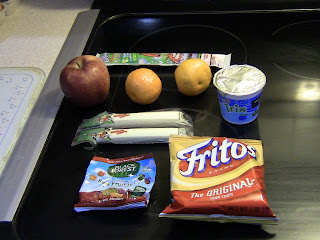

Now it’s time for the main meal. There are so many things you can make and pack for lunches at a fraction of the price. I buy pizza’s and pack her some after baking it in the oven the night before or early in the morning. She likes TV-dinners, tuna, canned spaghetti, summersausage,peanut butter and jellie, bologna, sliced deli meats and more. There are so many different things you can try for lunches or make yourself that will fill your child up. School lunches are ok, but the serving sizes are not enough for most children.


I also give my husband a bag lunch every day. I pack him last night’s supper or make him salads or fresh homemade soups. Buying this from a gas station or restaurant can cost your over $10.00 dollars a day. Making lunch at home and bringing to the office is much cheaper and healthier.

Eating healthy and saving money is my ultimate goal here. Packing lunches and giving my family a home cooked meal shows I care. My child likes taking her lunch every day to school and likes the comments she gets from her friend’s . Her friends all say they wish they could have a lunch like hers. Saving money on lunches only takes a little time and effort and your family will thank you for it. Plus your check book will thank you too.  Experiment with different foods you child might like and save money in the process. I hope you like my saving tips on school lunches from Suzie Homemaker.


Wednesday, January 6, 2016

Reuse Candy Tray for Homemade candy

What to do with that candy container inside my candy box? Don’t throw it away yet. You can reuse the candy container and make your own homemade chocolate candy. Everybody loves chocolate so why not reuse the container and make your own at a fraction of the price. Chocolate candy from the store is very expensive so why not make your own candy
.
First decide what you want to put in your candy. I like to use peanuts, cashews, cherries, caramels, and white chocolate chips inside my chocolate candy. Whatever you like in your chocolate is your choice, be creative. I love making my own turtles this way.


Take your tray from your candy box or use a muffin tin as your candy holder.


Next melt your chocolate (white or dark) and pour a little in you tray. Now, place your choice of nuts,  caramel or cherries on top of your chocolate. Pour a little more chocolate on top.

Take your tray and put in the freezer to harden. When the candy is hard, place in a sealed container and enjoy. Keep in a cool dry place and your homemade candy should last for a few weeks. But to be honest,  my candy never makes it that long.


Think how much money you can save by making your own homemade candy. Plus your whole family will love you for it. I love cooking and making things from scratch, and my family loves me for it. This one way I treat myself and my family and save money in the process. Enjoy your sweet treats from Suzie Homemaker.

Tuesday, December 29, 2015

After Christmas clearance sales

Time for those after Christmas sales! Now that it is a few days after Christmas you need to go to the store and save money on all those after Christmas sales. Now is the time to save 50% or more on what is left.


Check out your wrapping paper, bows and ornaments that will be marked down. This is where I save big because I stock up and have enough bought for at least the next couple of years. Paper and bows will not go bad or out of style in a couple of years.
 
Buy those Christmas cards and stock up  now. Buy enough to last a couple of years and save big. Go to the post office and stock up on those forever stamps because stamps are always going up.
I like to buy my Christmas napkins, plates and table clothes after Christmas for the following year. Saving money is always the ultimate goal here. Take advantage of the 50% or more off and save big time.


If you have children, here is a great way to buy St. Nick gifts for next years.  Don’t forget that this is a great way to buy those $5 to $10 dollars gifts you need for school exchange of work exchange.

 If you like your chocolate this is the time to save.Christmas candy is also on sale at this time at 50% off.


If you can wait for about a week some stores will have Christmas items left for 75% or more off.

Have fun shopping for all these deals and saving money in the process. Happy New Year’s from Suzie Homemaker.

Wednesday, December 23, 2015

Christmas Trees

Christmas Trees! Should I buy a real one or an artificial tree? When we were first married money was very tight so we decided to buy an artificial tree. This way you could use it over for the next year. Then my husband’s parents said we needed to buy a real tree when the children came around. Now that my children are almost grown up, do I need to have a tree at all? Every family has traditions, but depending on where you are in your life you can  decorate for Christmas any way you like. Today I will tell you all the ways that we have decorated for Christmas over the years.

When I first met my husband he never had a tree so I surprised him the next year with an artificial tree. This is where I saved a lot of money.  I bought the tree after Christmas on a clearance sale. I waited until almost all the trees were gone and then bought my tree at 75% off. I also bought all my decorations and garland at 75% off. This tree was used for over 6 years before we decided it was time to sell it at a rummage sale.

When the children came we were told they needed a real tree. As you know real Christmas trees are very expensive. They can range from $30.00 dollars and up. This gets very expensive when they are only up for a few weeks. To save on a real trees try cutting down your own. What we did as a family was find a tree place that sells trees cheaper if you have the whole family buy their trees there. We had over 6 families buying a tree at the same place and they gave us a discount.

Now that my children are grown up we decided not to have a Christmas tree. 21 years ago I received a fern as a gift, and it was only 6 inches tall. Today my fern is over 8 feet tall and is now my Christmas tree. I put an angel on top and bows and candy canes on for decorations. This has become my Christmas tree now for the last 3 years.


Have a very Merry Christmas from Suzie Homemaker.

Wednesday, December 16, 2015

Christmas Wreaths

Christmas time is for family and what better time to make some Christmas candy, cookies, and my famous Christmas wreaths. Every year at this time, I have people asking me to make my Christmas wreaths.  This has become a family tradition for over 25 years. Today I will give you my family recipe so you can start your own tradition.

Green Christmas Wreaths Ingredients

o   1 Package of Marshmallows                                 ¼ Cup butter
o   1 Package Red Hots                                                Green Food Coloring
o   6 Cups Corn Flakes Cereal
o   Makes about 2 dozen wreaths

1.       Take a very large glass bowl and put in ¼ cup butter and one package of marshmallows. Place the bowl in the microwave oven for about 1 minute. When marshmallows start to get big and fluffy they are melted enough and ready to be taken out.

2.       Take out of microwave and stir until butter and marshmallows look creamy. Add a few drops of green food coloring. Depending on how dark of green you want, you can always add more drops for a deeper green.


3.       Add your 6 cups of Corn Flakes Cereal. Stir until all cereal is cover and looks green.


4.       Line a couple of cookie sheets with wax paper.


5.       Make 1 to 2-inch size balls and put them on your wax paper lined trays. Take your finger and put a whole in the middle and then shape your circle to look like a wreath. Place your red hots around the wreath for color. (To make this easier you need to butter your fingers and hands every couple of wreaths. This way the wreath doesn’t stick to your fingers so bad.)


6.       Let stand for 1 to 2 hours to harden. Keep on wax paper until you are ready to serve.

I hope you enjoy one of my families Christmas traditions for Suzie Homemaker.