Wednesday, August 31, 2016

Homemade Appliance Covers

Today I am going to talk about covers for your toasters, can openers, blenders and mix masters. I have always had covers for these appliances, but recently they had become old and very dirty.
So I decided it was time to replace them after having them for over 10 years. I know I’m bad, but I don’t like to throw things away until I have to. So I went to a few stores to look for some new ones and compare prices. I checked at 4 different stores with no luck, no one even carries them anymore. Next, I went online to check for covers and got sticker shock. Mix Master covers start at $13.00 dollars and then go up from there.
Toaster covers start at $9.00 dollars and go up from there. Can Opener covers start at $7.00 dollars and go up there.  By the time I get all the appliance covers I need I would have to spend over $30.00 dollars. That’s way too much money to be spending on appliance covers. So this is what I decided to do, I went to my local Walmart and checked out the material section. Buying material is very expensive, but if you look for leftover scraps of material you can find some pretty cheap.

So today I am going to show you how I bought 1 yard of scrap material for under $4.00

dollars and made a Mix Master cover. This wasn’t very hard to do and it took me under 1 hour to make. If you do not have a sewing machine, ask a friend if you can borrow one. I still had my old cover so I used this for my pattern. If you do not have a pattern to use just place your Mix Master on the material and draw around it. Always measure your width, length, and height. Make sure you add a little extra for your seams.

After I measured everything out carefully, I cut out my pattern. Next, I pinned my first front panel to my side panel and sewed them together. Place your back panel on and sew this together. Sew up the bottom to make a nice seam and you are done.


With my extra material I have left, I am going to make a Toaster cover and Blender cover.
All you have to do is measure your width, height, and length very carefully adding a little for the seams. This was so easy to make and now instead of paying over $30.00 dollars I can have 3 covers for under $4.00 dollars. It’s amazing what you can save by just making these covers yourself. I hope you enjoyed another one of my saving tips from Suzie Homemaker.


Wednesday, August 24, 2016

Making Raisins from Home grown Grapes

                Dehydrating home grown grapes! Today I will show you my grape vines I have at home.
We have an old dog coop which is not being used for any dogs. Three years ago we ordered 8 grape vines from a seed catalog. The fencing was a great way for the vines to crawl up and grow. After three years we have a nice batch of grapes to work with. I use the grapes for making homemade juice, jams, raisins, and just to eat fresh. A couple of days ago my daughter and I took a ladder and picked grapes for an hour.

Today I am going to show you how to make raisins out of your grapes.

1.       Take your ladder and a pair of scissors and cut off your grape bunches.


2.       Take off your grapes from the stems and place in a colander. Rinse off your grapes.


3.       Make sure you have the seedless grapes to dehydrate.

4.       Place your grapes on your dehydrating trays and poke a little hole in them so they dehydrate 
correctly.

5.       Check your dehydrator for correct temperature and start dehydrating your grapes.

6.       My grapes took over a day to dehydrate.

7.       Place the raisins in a sealed container or zip lock bag and date them.


Another option is buying store bought grapes. Watch for the grapes to be on sale then buy a good amount to dehydrate. Take your grapes and cut them in half and place on your dehydrating trays. I find the home grown grapes to be much sweeter than the store bought grapes. Making your own homemade raisins is so much healthier and cheaper. This would be a good project to do with your children or grand- children. As you can tell I like to have home grown food because it is so much healthier for you. I love to grow, pick and process what I grow. Have fun making homemade raisins from Suzie Homemaker.


Wednesday, August 17, 2016

Farm Fresh Eggs VS. Store Bought Eggs!

Eggs, Eggs, Eggs! Should I buy them from a store or from a local farmer?  I know, eggs from the store are cheaper, but they are not as healthy or as fresh as eggs from a farmer.  When you buy eggs from a store they can stay on the shelf for up to a year. Yes, eggs from a farmer can be more expensive but think of the health benefits. Today I am going to tell you what we as a family did. I was brought up on farm fresh eggs even though we did not live near a farm. Every week we would visit my grandparents and pick up farm fresh eggs on the way home. Once you start eating farm fresh eggs you will taste the difference between the store bought and fresh. Believe me, the extra cost is well worth it.


We live out in the country and on a little farm, so this was a no-brainer.  We raise about 40 chickens for eggs for family and friends, plus my husband sells some at work. We started out small at first then gradually added more chickens.


First, you need to check out different breeds of chickens. We decided on the ambers because we wanted brown eggs. Check your local Coop for prices and availability. Or if you like, go online and find someone who is selling chickens. The Coop priced the chicks at a little over a dollar a piece. If you do not want to raise chicks, I suggest buying chicken that is around a year old. This way they are laying eggs already.

The second thing you need to buy is waters and feeders. Check out Fleet Farm or any Farm store for these. Depending on how many chickens you have the prices will very. Feeders and waterers start at $3.00 and go up from there.


The third thing you will need is a place to keep your chickens. We have a barn so we fenced them in and built a hutch for them to lay their eggs in. My husband took a couple pieces of plywood and put some hinges on the cover and cut a hole in front, for the chickens to enter. Place some straw down inside and this is where they lay their eggs.

If you live in town and only want a few chickens, you have some options. First, you need to find out your zoning ordinance for your city. Most cities will let you have up to 4 chickens no roosters. You have to have an enclosure for the chicken and all feed has to be in a sealed container   so no animals can get into it. I recommend Tractor Supply for a cheap Hutch. They have a Rugged Ranch Durango for chickens for $30.00 dollar. The size is a 5 foot by 10 foot wired cage for chickens. This is perfect for your back yard.

Now you can have a smaller amount of chickens and have fresh eggs every day. Chickens are pretty easy to take care of. This would be a fun project for the kids and grandchildren to help with. If your children are in 4-H or Girl Scouts this would be a great way to earn a badge. This gives them responsibility and the opportunity to learn how to take care of a different kind of animal.

Having chickens doesn’t take much time or work. Think of the health benefits and the fact that you can go outside every morning and have fresh eggs to eat for breakfast. Always do your research, before you decide if this is a good project you want to take on. Fresh Eggs every day!  Enjoy having chickens from Suzie Homemaker.


Sunday, August 7, 2016

Herb and Spice Gardens

Having a Herb and Spice  Garden is it worth it? I have a very small herb and spice garden in some pots outside. I decided to try herbs and spices this year on a small scale just to see how it would work. Next year I plan to expand on the herbs and spices a little more. I love to have fresh herbs and spices to put in my recipes when I cook. Buying herbs and spices in the store are very expensive. So one day when I was in a dollar store I saw some herb seeds and decided to give it a try. These seeds only cost me $1.00 dollar for 4 packages. So even if they didn’t turn out, I only had $1.00 dollar into this whole experiment.  I planted the herbs and spices in some pots and put them outside to grow. As you can see they turned out very well.
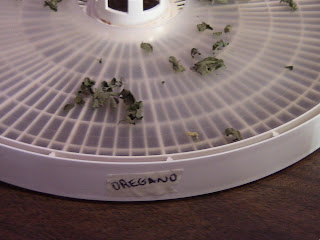
When the weather starts getting colder I will bring the plants inside for the winter to grow inside. So today I will show you how I dehydrated and how to freeze my herbs. You can have fresh herbs year round this way.

1.       First, cut your herbs by the stems and rinse them off.

2.       Take a slotted spoon and pull your herbs through the spoon leaving the stems behind. This saves a lot of time because you don’t have to cut or pick them off.


3.       Next take your herbs and place them on your dehydrator's trays. Make sure you label your trays so you know what herbs you have on them.


4.       When your herbs are dry just crush them and put in a zip lock bag or a sealed container. Label and date them.


5.       Use your fresh herbs in your favorite recipes and soups.


Here’s another way to keep your herbs fresh. If you do not have a dehydrator or you don’t want to dehydrate them, try freezing them. Take an ice cube tray and place your herbs in them and fill them up with water or olive oil. Freeze them. When you need some herbs, all you have to do is pop out what you need and add them to your favorite soups and recipes.  Each cube holds about 2 Tablespoons of herbs. Freezing your herbs is very easy to do and very convenient.


Growing your own herbs is easy and can save you a lot of money. This would be a great project to do with your children or Grandchildren. I love the smell of fresh herbs especially while they are dehydrating in my kitchen. When I try something and it works well I like to share it with you. Have fun growing your own herbs and spices, from Suzie Homemaker.


Monday, August 1, 2016

How To Can Beans

It’s canning season again, and today I will show you how to can beans. This time of year is my favorite because I get to go pick fresh vegetables from my gardens. When I start getting so many that we can’t eat fresh, I then start canning them to have for the rest of the year. Canning is a great way to preserve your fresh fruits and vegetables to have year round. Canning has been in my family for years and I hope to pass it onto my own children. Canning your own fruits and vegetables is a way to have fresh food and a fraction of the cost. Store bought fruits and vegetables in a can, is full of sugar and preservatives and not healthy for you. So today I will show you step by step how I can my beans fresh from my garden.

Before you begin, check your canner to make sure your seal is not cracked. Next, wash your canner with hot water. Wash all your jars and canning covers with hot water.


1.       After picking your beans start snipping off the ends.
2.       Cut or snap your beans into pieces and place in a colander.
3.       Rinse your beans off under the water.
4.       Put your cut beans in a large kettle with water and boil them for 5 minutes.

5.       While your beans are cooking boil another kettle of water to pour over your beans.

6.       After the beans have boiled for 5 minutes start filling your jars. Press your beans in your jars filling them to about ¼ inch from the top. Add your canning salt. I use ½ teaspoon of canning salt for each pint jar.

7.       Pour your boiling hot water over the top of your beans filling them to about 1/8 inch from the top. Place a knife done the sides of the jars to release the air bubbles.

8.       Boil your canning lids and place them on your jars and screw the covers on tightly.

9.       Place your jars in your canner and put in the correct amount of water for canning. (Check your canner directions for this).

10.   Place cover on tightly with the pressure gauge on the correct setting for canning beans. (Again check your canning direction book). My canner asked for 10 pounds of pressure for 20 minutes.
11.   Watch your pressure gauge and when it starts giggling start your timer. Make sure the pressure gauge giggles every 15 to 20 seconds to keep the pressure going.

12.   After 20 minutes remove canner from the burner and let stand for 1 hour before opening your canner. You want to let the canner cool down before opening. Take a pot holder and check that the pressure has been released before opening the canner.
13.   Use your can lifter and remove your jars. Place them onto some pot holder to cool. Let them stand for 24 hours before removing covers. Take a permanent marker label and date your jars. Place in a cool dry place to be eaten at a later date.


Canning is a great way to preserve foods. I use a Mirror Canner for large batches and a smaller Mirror Canner that was handed down to me from my grandmother. If your family is bigger this is a great way to save money on fruits and vegetables. Canning is a tradition in my family and I love growing and preserving what I grow. I hope you enjoyed my canning beans  from Suzie Homemaker.